Chordbot 3.0 Manual
- Introduction
- Playback controls
- Editing chords
- Key/modes
- Slash chords
- Inversions / Octaves
- Instrument mixer
- Mixer presets
- Tempo
- Song sections
- File menu
- Loading a song
- Erasing a song
- Transposing songs
- Copy/Paste
- Settings
- Exporting files/backups
- Opening exported files/backups
- Song-O-Matic
- Help/Feedback
Last updated: 2020-06-11
Introduction
At the top of the main screen is a command bar that lets you control playback, access menus and navigate between different song sections. The commands in the command bar are (from left to right):
NOTE: Chordbot will use different layouts depending on if you are using a phone or tablet. Both versions have the same functions but the tablet version will show some of the functions directly on the main screen instead of in menus and some commands will be in slightly different places.
- Previous section
- Navigates to the previous song section
- Section menu
- Opens the section menu
- Next section
- Navigates to the next song section
- Play/Pause
- Starts or pauses playback
- Undo/Redo
- Opens the undo/redo menu
- Mixer
- Opens the mixer/style preset menu
- File/Tools
- Opens the file/tools menu
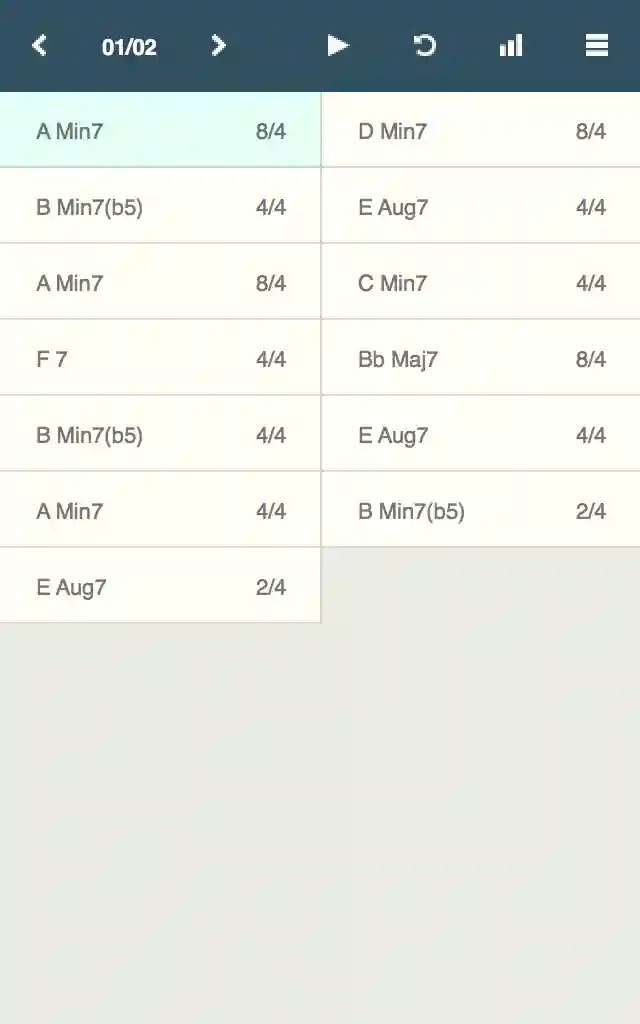
Under the command bar is the chord table that contains the chords that are used in a song or section. In each chord in the list the chord root and chord type will appear to the left and the chord duration will appear to the right.
Clicking a chord (short-click) opens the chord editor menu (shown to the right of the main screen in the tablet version). From the chord editor you can edit all the individual properties of a chord, insert new chords or remove the currently selected chord. See the chapter on the chord editor for more information.
Table of contentsPlayback controls
Click the play button on the command bar to start playing the song. The song will always start from the currently active chord, so if you want to start at a specific chord you simply select that chord by pressing and holding it down for half a second (long-clicking). While the song is playing you can also seek to a specific chord by long-clicking it. Pause the song by pressing the pause button (only visible when the song is playing).
You can edit the chords or change any setting in real-time while the song is playing. After making a change the song will resume either from the the changed chord, the previous chord, or the beginning of the section, depending on the Chord edit mode setting. Press and hold the play button to rewind the song to the beginning.
Table of contentsEditing chords
NOTE: In the tablet version the chord editor is displayed on the right side of the main screen.
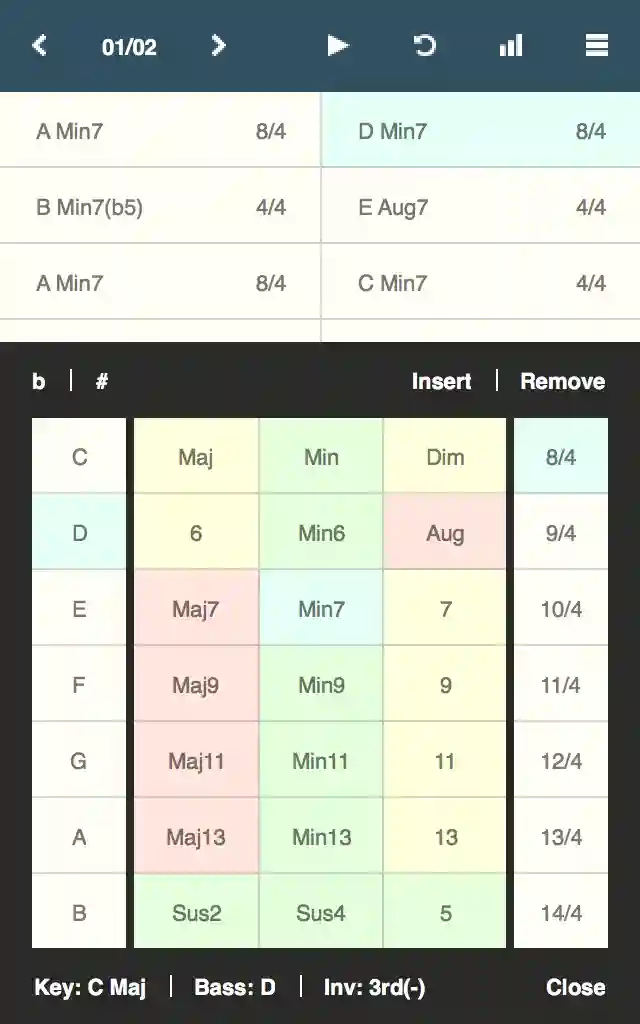
Clicking a chord opens the chord editor. The chord editor lets you add and remove chords as well as edit the following properties of individual chords:
- Root note (C, Eb, F#, etc.)
- Chord type (Min, Maj7, Dim, etc.)
- Chord duration (4/4, 2/4, etc.)
- Bass note (slash chords: C/B, Am/G, etc.)
- Octave and inversion
- Current key/mode
In the top left of the chord editor are insert and remove buttons that either insert a new chord after the current chord, or removes the current chord. In the top right are buttons for making the current chord sharp or flat. Under these are three tables that lets you set the root, type and duration of a chord.
The root table lets you select the starting tone of a chord. The alternatives available correspond to the currently selected key/mode but can be temporarily altered with the previously mentioned flat/sharp buttons.
The type table is a color coded list of chords that are loosely arranged to show major chords in the first column, minor in the second and dominant chords in the third. Some exceptions have been made for convinience so this order is not strictly followed throughout the table.
The chord types in the table are color coded according to their diatonicity in relation to the selected key/mode. That is: How well the tones in the chord fit in to the currently selected key. The color coding scheme uses the following rules:
- Green: All chord tones belong to the current key.
- Yellow: All chord tones except one belong to the current key.
- Red: Two or more chord tones are outside the current key.
Green chords are guaranteed to sound good together (at least in a traditional sense). Yellow chords can sound good (or edgy) in certain situations, while red chords are more likely to clash with other chords (in the current key). These are not absolute laws so depending on what kind of sound you are looking for a red chord might be perfect for your song.
At the bottom of the chord type table is a Silence chord type. Choosing this chord type is equivalent to inserting a rest for the duration of the chord.
The right-most table controls the duration of the chord in quarter notes. Please note that the duration only controls for how long the chord is played, it does not control the rhythm of the chord or the time signature of the song. These properties are instead decided by the instrument tracks used in the Instrument mixer. Most instrument tracks are however designed for the time signature 4/4 and will consequently sound best with durations that are even multipliers/divisors of 4 (2/4, 4/4, 8/4...).
By default you will hear a preview of the current chord when you change one of its properties. This can be turned off by toggling Chord preview in the settings.
Tip: You can use the undo menu from the command bar to undo any unintentional changes.
At the bottom of the screen are buttons to open up menus that control key/mode, bass note (slash chords) and octave/inversion.
You can scroll and select other chords in the chord table while the chord selector menu is open but to get a better overview of your chords you can close the menu by pressing the close button at the bottom right of the menu.
Table of contentsKey/modes
The content of the root table and the color coding of the type table on the chord selector menu are based on what key/mode that is currently selected. You can change this by clicking the Key/mode button on the chord selector menu to bring up the Key/mode selector.
This menu shows all common western keys and modes. Changing modes changes which keys are available. Keys with double harmonics (bb/##) are excluded. The notes in the currently selected key/mode are displayed in the bottom left of the menu. Click close to return to the chord selector.
Tip: Selecting an unusual mode and using diatonic (green) chords can be a good way to discover interesting and original chord progressions.
Table of contentsSlash chords
A slash chord is a chord with a custom bass note, written out in the form X/Y (C/B, F/E, etc.) where X is the root note and Y is the custom bass note. Click the second button from the left ("Bass: X") on the chord edit menu to open the Bass note menu and set a custom bass note.
If the bass note you want to set is already part of the chord you might get better results changing the chord's inversion instead.
Note: Some instrument tracks do not support slash chords. In these cases you will need to add a separate bass track to get the specified bass note.
Table of contentsInversions / Octaves
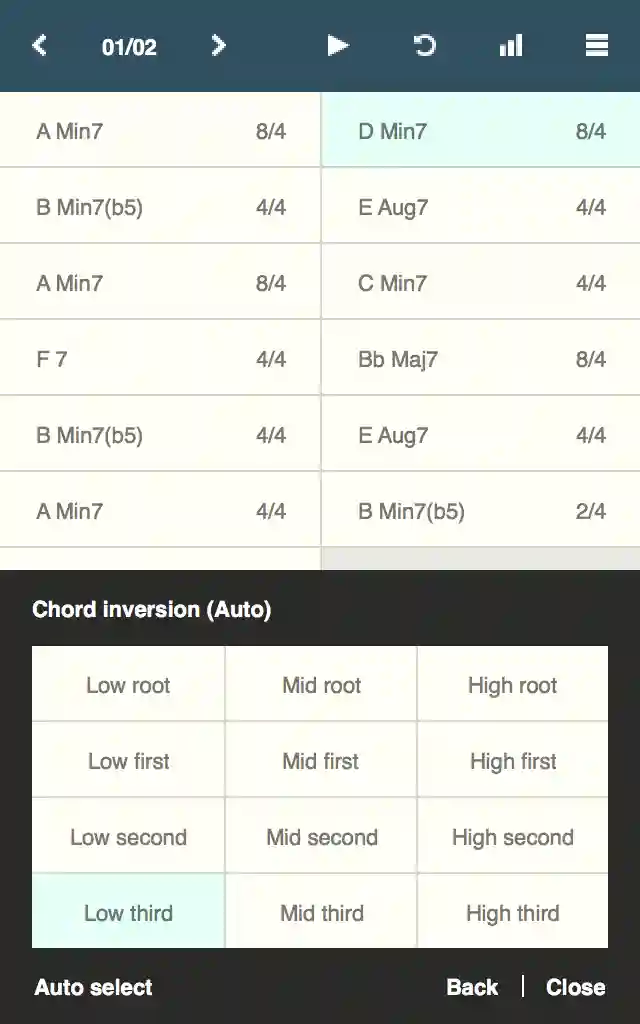
The inversion of a chord describes the order in which the notes of the chord are stacked (basically which note is put lowest). By default, Chordbot will try to select the inversion that results in the least amount of movement from the previously played chord. This usually gives a smooth progression, but in some cases this might not be optimal or desired. In these cases you can select both the octave and the inversion of the chord manually:
Click the third button from the left ("Inv: X") on the chord edit menu to open the Inversion selector submenu. The inversion selector lets you select the octave (low, mid or high) and the inversion of the current chord. The number of inversions possible depend on the number of notes in the chord. A three note chord has three possible inversions in each octave, while a four note chord has four inversions per octave.
Click the button Auto select if you have set an inversion manually but want to revert to automatic selection.
Note: Setting an octave / inversion manually will recompute the inversions for all the following chords that are set to auto select.
Table of contentsInstrument mixer
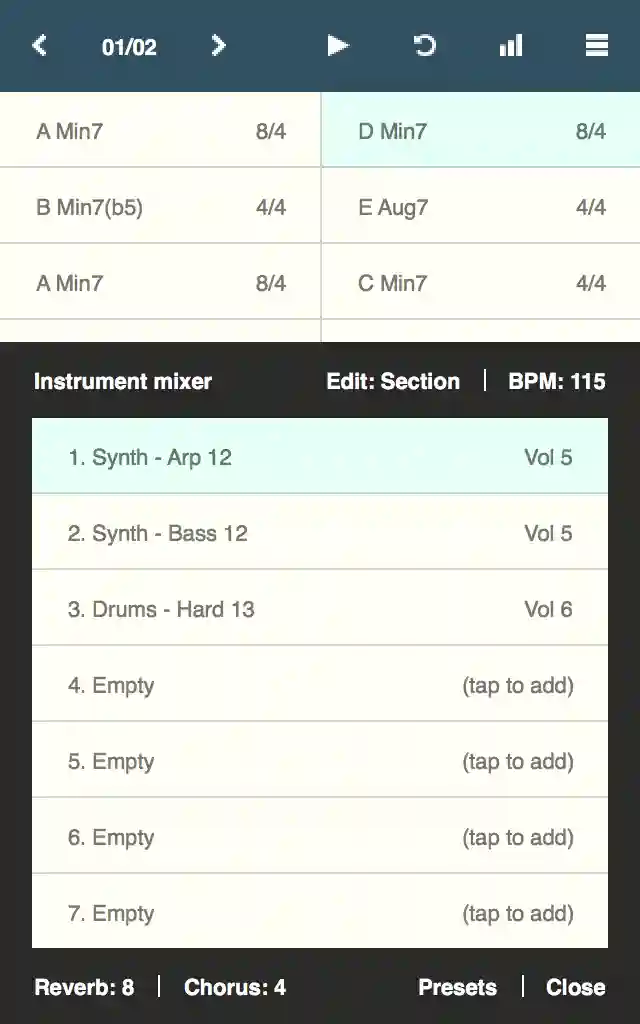
Clicking the Mixer button in the top right corner of the main screen brings up the instrument mixer. The instrument mixer lets you combine tracks of comping patterns played on different instruments to create a complete arrangement. The instrument mixer also lets you set the master reverb and chorus level of the current song.
You can either have a separate mixer setup (instrument arrangement) for each section in the song, or one global setup that applies to all sections. Toggle the mode you want to use by setting the edit mode switch at the top right of the instrument mixer to either All sections or Current section.
Click the Reverb or Chorus buttons to set the master effect levels of the song or section.
You can use up to eight instrument tracks per section. Click an empty track to add a new instrument, or click an existing track to change its settings. This will bring up the instrument selector menu.
The instrument selector consists of three lists that lets you select (from left to right):
- Instrument type
- Specific instrument/comping pattern
- Volume level
MISSING TITLE
There are over 350 comping patterns split over seven instrument types. Select an instrument type in the leftmost list to show all the corresponding comping patterns in the middle list. Select a comping pattern in the middle list to change the current track or to add a new one to the mixer setup.
Patterns are grouped and named either by specific instrument (FM, Rhodes, etc.) or playing style (picked, strummed, etc.). The first patterns in a group are usually very simple, consisting of notes that are just played and held over a number of beats, while later patterns will generally be more complex.
Most patterns are intended for songs in 4/4 time, but there are a few that will work also for other time signatures. These patterns usually have their recommended time signature written out in the pattern name. Simple patterns like 'Piano > Hammered 01' will probably work well for any time signature. There are also a number of metronome tracks for other time signatures at the bottom of the drum pattern list.
Use the Solo on/off switch in the top right corner to listen to the current track only (mutes all other tracks). Click the Remove track button to remove an existing track from the mixer setup. Click the Back button to return to the mixer, or the Close button to return to the main screen.
Note: There is currently an empty instrument type called Legacy that is reserved for future deprecated or replaced tracks. Disregard this for now.
Table of contentsMixer presets
Pressing the Presets button brings up a list of mixer presets. Presets are prearranged combinations of instrument tracks that can be used to quickly try out different comping styles. Click a preset to load its predefined tracks into the mixer.
Most of the presets are imported from earlier versions of Chordbot where there were only prearranged styles and no track mixing capabilities. The original preset names were kept for legacy reasons, but unfortunately these are not always very descriptive. Not every style from the old version is available as a preset, but all the tracks that they were made up of are still there. If there is a particular style that you are missing from a previous Chordbot version you can use this list to find out what tracks you need to combine to recreate it.
Table of contentsSettings
Click the File/Tools [...] button on the main screen and then click the Settings button on the bottom left to show Chordbot's settings menu. The following settings can be changed:
- Loop songs
Decides if songs stop or restart after playing to the end.
Default: On - Count in
Decides how many count in beats that are played before the song starts.
Default: Off - Chord preview
Decides if changes of chord properties are previewed while paused.
Default: On - Chord resume mode
Decides from what chord playback should resume after being changed.
Default: Resume from active chord - Concert pitch (key)
If you play a transposing instument (saxophone, trumpet, flute, etc.) that isn't notated in C you can use this setting to set what pitch is actually played as the tone C in the app. The following keys are supported: C, Eb, F, G, A, Bb.
Default: C - Concert pitch (Hz)
Decides what reference pitch that should be used for Concert A.
Default: 440 Hz - Export GM instrument map
If this option is enabled Chordbot will add MIDI Program Change (PC) messages corresponding to the somewhat archaic General MIDI (GM) instrument mapping standard at the start of each exported MIDI track. This will enable GM compatible synthesizers to play Chordbot songs with the same instrumentation as in the app without any extra configuration. Unfortunately these messages can confuse many modern soft-synthesizers and cause unwanted patch changes. If this happens with the synth you are using you should disable this option and export the song again.
Default: On - Export mix
Decides if exported WAV files should be mixed in mono or stereo.
Default: Stereo - Fade out exported tracks
Adds some silence at the end of exported WAV-files to give all instrument sounds time to ring out. Enable this if your exported songs end to abruptly. Disable if you want your songs to be easily loopable.
Default: Off
Tempo
Press the tempo button (XXX bpm) near the bottom right of the main screen. A list of tempos from 40 to 399 beats per minute will appear. Click one of the tempos to select it.
Table of contentsSong sections
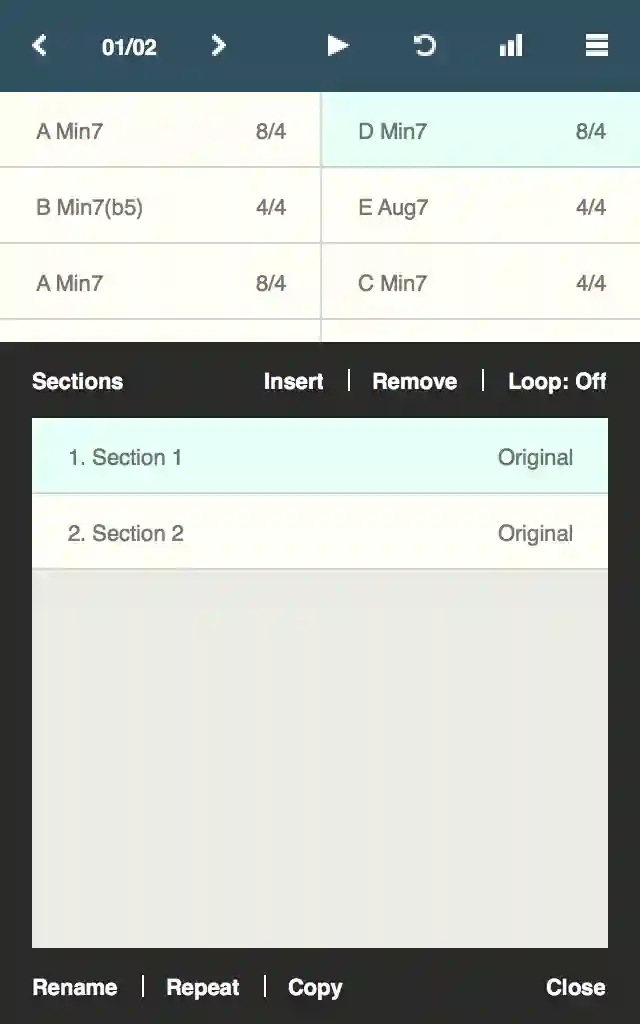
This feature can be used to group parts of your song in reusable and repeatable sections (intro, verse, refrain, etc.).
The section control bar at the top of the main screen consists of two navigation buttons and a label that shows the position of the active section. The navigation buttons lets you navigate between different sections while pressing the label opens the section editor.
The section editor shows a list of all sections in the order they will be played. Sections can either be original or repeated. An original section is a section with new material while a repeated section simply repeats a previous original section.
To add a new (original) section:
Click the position where you want to insert the new section and click the button Add (the new section will be inserted after this position).
Enter a name for the new section (ex: verse, refrain, etc) and click OK.
To repeat an existing section:
Click the section you want to repeat, then click the button Repeat.
Click the position where you want to insert the repeated section.
A repeated section is linked to the original section it is repeating. Editing a repeated section changes the original and vice versa. Repeated sections can't be placed before the original section on which they are based.
To remove a section:
Click the section you want to remove and click the button Remove.
Removing an original section also removes the repeated sections that are linked to it.
To rename a section:
Click the section you want to rename and click the button Rename.
Enter a new name and click OK.
To copy a section:
Click the section you want to copy and click the button Copy.
Click the position where you want to insert the copied section.
The difference between a repeated and a copied section is that changes made to a copied section will not affect the original section.
Loop on/off: (section looping)
Set this to on if you want the current section to loop instead of progressing to the next section.
Sync on/off: (synchronized section switching)
This setting controls if manual section switches are performed as soon as possible (off) or only after the current chord is done playing (on).
If you enable this setting and click a section in the section list (while the song is playing) Chordbot will wait until the current chord has played to completion before switching to the selected section. This can be useful during performances to make sure that transitions between different sections are made at the correct time and tempo.
This setting is only used when you click a section in the section list, the navigation buttons on the main screen are not affected and will always switch as soon as they are pressed.
Table of contentsFile menu
Press the File/Tools button [...] on the command bar and select Save. Enter a name for your song and press the Save button.
- To save changes to an existing song, repeat the above procedure without changing the original name.
- To save the current song as a new song, repeat the above procedure and give the song a new name.
Chordbot automatically saves its current state when closed and restores it the next time it is started so your last changes should persist between sessions regardless of whether you saved them or not.
(Saving is disabled in the lite version)
Table of contentsLoading a song
Press the File/Tools button [...] on the command bar and select Open. A list of your saved songs (and demo songs) will appear in alphabetical order. Select the song you want to open and click the button Open to load the song.
When loading a song in paused mode the file menu will close automatically. When loading a song during playback the file menu will remain open for quick previewing of songs.
Table of contentsErasing a song
Press the File/Tools button [...] on the command bar and select Open. Select the song you want to delete and click the button Delete. Confirm that you want to delete the song.
Table of contentsTransposing songs
Press the File/Tools button [...] and select Transpose. Select the number of semitones you want to transpose your song with. Transpositions are made upwards (+) or downwards (-) in a one octave range. Transposing a song up by 11 semitones is the equivalent by transposing down 1 semitone.
If you want Chordbot to play in a different octave you should use the inversion selector to lower or raise the octave of the first chord of the song instead (subsequent chords will follow automatically).
Table of contentsSong-O-Matic
Chordbot's song generator Song-O-Matic can help you create a chord progression to get you started on a new song. Many of the generated progressions might sound cheesy or just plain bad, but once in a while Song-O-Matic actually manages to create some useful progressions. The Song-O-Matic function can be accessed through the File/Tools menu and has three settings:
- Plain Pop
Creates a standard pop progression harmonized with simple safe chord types. - Justified Jazz
Creates a standard jazz progression harmonized with common safe jazz chord types. - Schoenberg Surprise
Generates a semi-random progression and harmonizes it with a wider range of more risky chords.
Copy/Paste
To copy a range of chords:
- Select the first chord in the sequence you wish to copy
- Click the File/Tools button [...], select Copy/Paste, then select Copy from selected chord
- Select the last chord in the sequence you wish to copy
- Click the File/Tools(¹) button and select Copy to selected chord
- Select the position where you want to paste the sequence
- Click the File/Tools button and select Paste after selected chord
(¹) When a copy/paste procedure has been initiated pressing the File/Tools button will bring you straight to the Copy/Paste menu.
Table of contentsExporting files/backups
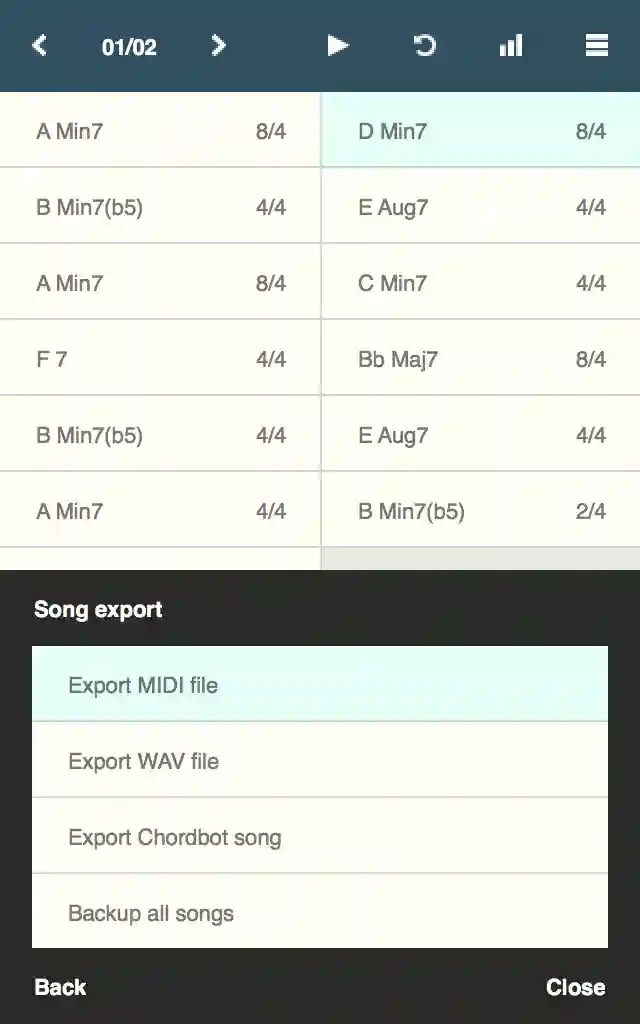
(Export features are disabled in the lite version)
Click the File/Tools button [...] and select Export to open the export menu. Chordbot can export files in the following formats:
- MIDI - Lets you edit your song further in any MIDI-sequencer (GarageBand, Cubase, etc.)
- WAV - Standard audio format that can be played back in most audio players
- Chordbot song - A native JSON-based format that can be used to share songs with other Chordbot users (both iOS & Android)
- Backup - Lets you backup and transfer your song library to other devices
After clicking one of the types above a system menu will appear and ask you what you want to do with the exported file. Depending on what OS you are using and what other apps are installed on your device the file could either be opened in another audio app, saved to local/cloud storage or sent by email/bluetooth to another device.
Android:
Since version 3.0.8 Chordbot uses the new Android file provider scheme instead of writing files directly to a chordbot directory like in previous versions.
You can still save files to local storage with the new version, but you'll have to send the file to a file manager app first in order to select where you
want the file to be saved.
Unfortunately not all Android file managers are compatible with the new scheme yet, so if your regular file manager fails to receive files from Chordbot you could try this app instead.
Table of contentsOpening exported files/backups
Importing Chordbot files (song files or backups) back into Chordbot works in pretty much the same way as when opening attachements or files on a Mac or PC: Open the file in a file manager, mail client or web browser and choose Chordbot in the 'Open with' dialog. You will be asked to confirm the import, after which the imported song/songs will be added to your current song library.
Extra clarifications:
- You can not open exported files from inside Chordbot. You must open the files externally and let the operating system trigger the import.
- Only exported song files (in JSON format) can be imported back into Chordbot. It is not possible to get exported MIDI or WAV files back into the app.
Android:
Depending on your file manager Chordbot might not be listed as an option in the 'Open with' dialog. If this happens you could try
this app instead.
iOS:
Some file managers will first show Chordbot files in JSON format as plain text.
If this happens there is usually an Open icon in the top right corner (or similar) that you can use to open the file in Chordbot instead.
Importing files does not overwrite any existing songs.
Table of contentsHelp/Feedback
If you need help or if you have feedback/suggestions for future versions, please contact:
support@chordbot.com
Thanks for using Chordbot!
Table of contents